Pin it plugin

Pin it plugin

Related Posts Plugin for WordPress, Blogger...
Powered by Blogger.
RSS

Celebrating the birth of a Messiah!

Long time ago in Bethlehem so the Holy Bible say
Mary's boy child Jesus Christ was born on Christmas Day.
Trumpets sound and angels sing, listen to what they say
That man will live forevermore because of Christmas Day.

The Golden Christmas Cake, prepared months ago, decked up to give  Glory to the new born King!


Ingredient
500 gms marzipan,
500 gms ready to roll icig,
silver dragees or pearls,
Apricot Jam

Warm the apricot Jam. Roll the marzipan on a surface lightly dusted with icing sugar. With the help of the pastry brush spread the apricot jam on the cake and cover it with marzipan, then with the ready to roll icing. Make star shape with a cookie cutter and stick it with the help of apricot jam, decorate with pearls or dragees.

MERRY CHRISTMAS!!!!

  • Digg
  • Del.icio.us
  • StumbleUpon
  • Reddit
  • RSS

Adding Sparkle to your Christmas: Candy Cane Cup Cake!


With this chilly sensation, I wanted to light the fire, draw the curtains, and bake these minty candy cane cupcakes, and add a sparkle to the Christmasy feeling around! These red velvet cupcakes, topped with minty meringue butter cream, the marble effect, goes together the lined candy canes floating on the top.
The candy cane cupcakes are something everyone must have for Christmas!!
For the cup cakes
175 gms pain flour,
175 gms unsalted butter,
175 gms caster sugar,
1 teaspoon vanilla extract,
125 ml buttermilk,
2 eggs, beaten,
Few drops of red coloring,
Pinch of salt,
1 teaspoon bicarbonate of soda,
1 teaspoon white wine vinegar
For the Meringue Butter Cream
200 gms caster sugar,
3 egg whites,
250 unsalted butter, softened
1 teaspoon of peppermint extract
12 candy canes, different flavours
Preheat the oven to 180 C, Gas mark 4.
Cream together the butter and sugar until fluffy and light. Add in the beaten eggs, mixing well between each addition. Tip in the vanilla extract and the colour and mix with an electronic beater.
Sift in the flour, cocoa and salt. Add in gradually with the buttermilk. In a separate bowl mix together soda bicarbonate and vinegar. Add  it to the mixture.
Line in the muffin tin with 12 muffin cases. Divide the mixture into 12 filling the muffin to two thirds full.
Bake 25-30 minutes, and or when the skewer inserted comes out clean. Remove from the oven, and leave to cool in the muffin tin for 10 minutes then on the wire rack to cool completely.
Add the egg whites and caster sugar in a heatproof bowl and set over a pan of boiling water.  Whisk with an electronic mixer until the mixture has doubled in volume, and started to form glossy peaks. Gradually add in the butter to the cooled meringue and beat constantly, add in the mint extract.
Divide the peppermint Meringue Butter cream between two bowls. Tint one using the red food colouring. Fill in the piping bag with a spoon of the Butter cream tinted red then with the spoon of the plain Butter cream to give a marbled effect when piped onto the cupcakes. Pipe swirls into each cupcake and top it with a Candy Cane
Merry Christmas.


  • Digg
  • Del.icio.us
  • StumbleUpon
  • Reddit
  • RSS

Decorating Christmas Trees!: Merry Christmas Everyone!!


Finally after the long long wait, Christmas is here, and I got my chance to set up my Christmas Tree, how exhilarating!  Can I ever have enough of decorating Christmas Trees! No it has to go with no end in sight! So here I am, setting up some more Christmas Trees!! With my favourite song
For the cupcakes
175 gms light muscavado sugar,
50 gms of unsalted butter,
½ teaspoon of vanilla extract,
150 gms of plain flour,
75 gms of dark chocolate chopped, into small pieces,
2 eggs beaten,
1 tablespoon of cocoa powder,
½ teaspoon of baking powder,
1 teaspoon of soda bicarbonate,
125 ml sour cream,
75 ml boiling water
Green food colouring paste,
Edible glitter and decorations
Preheat the oven to 180C/Gas Mark 4. Melt the chocolate in a double boiler; add in the butter and sugar and beat till light and creamy.  Add in the beaten eggs, mixing well at every interval., add n the Vanilla and melted chocolate and stir well.
Sift the flour, cocoa, baking powder, bicarbonate, add in the sour cream.
Divide the batter, into 12 into a muffin tray lined with muffin cases. Bake on the middle shelf of the preheated oven for about 25-30 minutes, or until golden, and check with the toothpick test. Remove from the oven and leave to cool in the tin for 5 minutes then to wire rack.

For the Icing
350 gms unsalted butter, softened,
700 gms icing sugar sifted
Few drops of vanilla extract
Put ¾ of the buttercream in bowl and tint it green using the food coloring paste. Leave the rest and spread over each cupcake.
Fill in the piping bag with the green frosting and start working from the center, pipe towards the edge of the cupcake. Keep layering till the time the cupcake resemble a Christmas Tree. Dust with edible glitter, and other edible decorations.

Merry Christmas Everyone!!!!

  • Digg
  • Del.icio.us
  • StumbleUpon
  • Reddit
  • RSS

A Pot of Tea and Lemon Drizzle Cake!


And when the holidays have started and when friends have more than one reason to meet to celebrate this festive season, I knew none of my friends could  every say no to the the lemony charms of this  classic lemon drizzle cake for a great tea-time treat!! This wonderfully moist, fruity and tangy cake only gets better as days pass by!


INGREDIENTS

175gms self-raising flour,
175 gms caster sugar,
150 gms butter,
rind of 1 lemon,
125 ml luke warm milk,
2  eggs beaten

For the Lemon Drizzle,
140 gms icing sugar,
50 ml fresh lemon juice

Preheat the oven to gas mark 4. Prepare a 7 inch square inch tin with a baking paper.

Put together the eggs, caster sugar and magarine in a mixing bowl and beat with an electric beater until fluffy. Tip into lemon rind, add in the flour and mix gently and evenly. Stir in the milk, mixing evenly, the add this mixture evenly into the prepared tin.

Bake in the preheated oven for 45 minutes, or until golden brown and firm to touch.  Remove from the oven and let it cool in the tin on the wire rack.

To make the lemon drizzle, put the icing sugar and the lemon juice in a small saucepan and heat on low flame, untill the sugar dissolves.

Prick the warm cake on the top and tip in the lemon drizzle, allow the cake to absorb it entirely.

When completely cool, cut the cake into bars.

  • Digg
  • Del.icio.us
  • StumbleUpon
  • Reddit
  • RSS

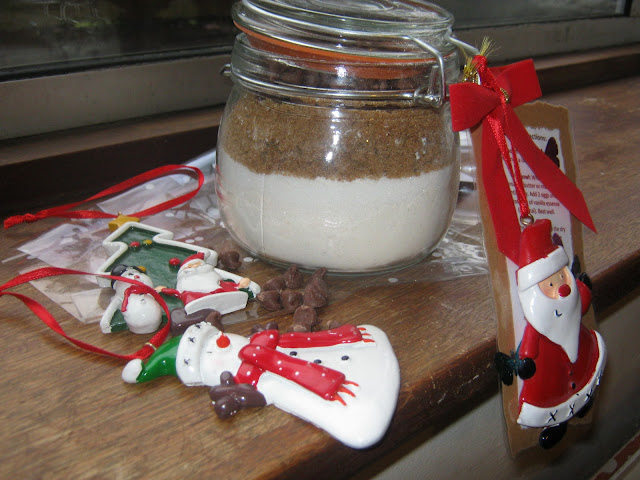
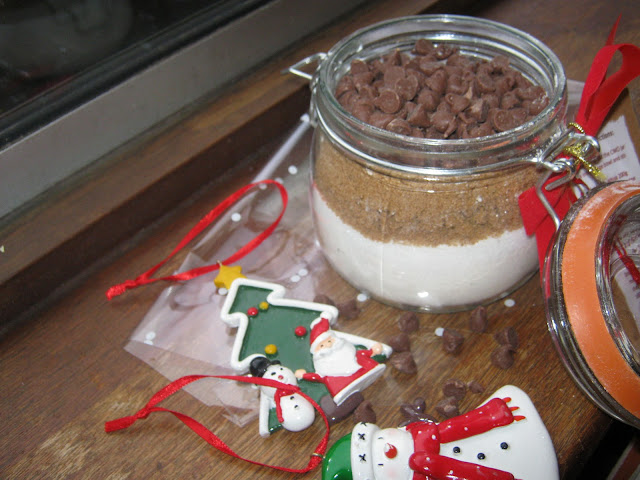
Jar of Joy: Chocolate Chip Cookie Jar!

There is magic in the air with the festive season of Christmas around, the joy of decorating the Christmas Tree, the beautiful sight of the city so bright and radiant welcoming the new year! the shopping centers looking so inviting with all the Christmas goodies, but what makes this season all the more special is, that it gives us a chance to express our love and blessing to our dear ones with all the special Christmas gifts. The tradition of becoming Santa, ringing the door bells of our near and dear ones on the eve of Christmas, and leaving them guessing who is this blessing from!! This Christmas, for all my foodie near and dear ones, this Jar of  Joy to wish you all a Merry Christmas!


INGREDIENT TO GO IN THE COOKIE JAR

175 gms of plain flour,
1 tsp baking powder,
85 gms muscavado sugar,
55 gms caster sugar,
100 gms of plain chocolate chips


INSTRUCTIONS TO GO ON THE RECIPE CARD

INGREDIENTS
1 tsp vanilla extract,
1 egg beaten,
125 gms butter,

Pre-heat the oven to Gas Mark 5. Lightly grease two baking trays.

Mix all the ingredients from the jar, with vanilla extract, butter and egg and beat until well combined.

Place tablespoon of the mixture on the prepared baking trays, spacing them  well apart to spread during cooking. This should make approximately 15 cookies.

Bake in the pre-heated over for about 15 minutes, or until golden brown.

Transfer the cookies to the cooling rack to cool down completely.

  • Digg
  • Del.icio.us
  • StumbleUpon
  • Reddit
  • RSS

Winter Cravings: SPINACH AND MUSHROOM LASAGNE

In the cold cold weather outside, really really chilly, what could be more comfortable than the whole family coming together and devouring on this comforting, rich and hearty layers of greens, bursting with the flavours of basil and taste and nutrition of the wild mushrooms,  mmm....for all those winter cravings!  Eating absolutely the tops first!  Enjoy this epitome of versatility !


Ingredients
115 gms butter,
2 garlic cloves, finely chopped,
115 gms shallots,
225 gms wild mushrooms,
450 gms spinach, cooked drained and finely chopped,
280 gms freshly grated Cheddar Cheese,
¼ tsp freshly grated nutmeg,
1 tsp chopped fresh basil,
55 gms plain flour,
600 ml hot milk
8 dried pre-cook lasagne sheets,
Salt and black to taste

Preheat the oven to 200C/ f00F/ Gas Mark 6. Lighly grease an ovenproof dish with a little butter.
Melt the butter in the pan on low heat, add the garlic while the butter is not too hot,  tip in the shallots, and then the wild mushrooms and cook for 3 minutes, tip in the cooked spinach, 225 gms of the Cheddar cheese, the nutmeg and the basil.
Season with salt and black pepper and keep aside.
Melt the remaining butter in another pan over a low heat. Add the flour and cook, stirring continuously for one minute. Slowly add in the hot milk, stirring until smooth. Stir in 25 gms of the remaining cheese and season to taste with salt and pepper
Spread half of the mushroom and spinach mixture over the base of the prepared dish. Cover with a layer of lasagne, then with half the cheese sauce. Repeat the process and sprinkle over the remaining cheese. Bake in the preheated oven for 30 minutes, or until golden brown. Serve immediately

  • Digg
  • Del.icio.us
  • StumbleUpon
  • Reddit
  • RSS

MasterChef or Apprentice: Welsh Cakes


A mishmash of Masterchef and Apprentice, a cooking challenge, where two squads, boys vs girls, where Lord Sugar is on the look for for the most excellent Welsh dish, what could I have done to prevail this? Welsh cakes of course!

http://www.studentcooking.tv/videos/low-fat-laughs/the-glamorgan-apprentice


Here’s the Welsh Cake recipe from The Glamorgan Apprentice video, so you know how to cook up these tasty traditional treats yourselves!

WELSH CAKES

Ingredients:
• 1 lb plain flour,
• 1 teaspoon baking powder,
• 1 pinch allspice,
• 1 pinch salt,
• 200g butter,
• 150g sugar,
• 100g seedless raisins,
• 2 eggs beaten,
• Few drops of milk to beat

Method:
1. Sift together the flour, baking powder, all spice and salt in a large bowl.

2. Rub in the butter till the time the dry ingredients with butter resemble breadcrumbs.

3. Add the beaten eggs to the mixture, with a few drops of milk to make a fairly stiff dough.

4. Roll out the dough on a lightly floured surface to a thickness of about 1/4 of an inch and cut into 2-inch rounds with a pastry cutter.

5. Cook on a well-greased griddle or a heavy based frying pan for about 3 minutes each side on a low flame until each side is golden brown.

6. Sprinkle with castor sugar and serve warm.

  • Digg
  • Del.icio.us
  • StumbleUpon
  • Reddit
  • RSS

Trick-or-treating: Happy Halloween

What I love about the celebration of Halloween is when my litte friends come disguised with the question "Trick or Treat", with the idle threat ofcourse I choose the 'Treat' part of the deal!. This is my preparation to wish my wonderful friends who are going to knock my door asking for sweeties! I am looking forward to welcome them !


INGREDIENTS
115 gms unsalted butter,
115 gms caster sugar,
2 eggs beaten,
3 tbsp milk,
140 gms self raising flour,
1/2 tsp baking powder,
orange  and black food coloring,
500 gms ready to roll icing,
2tbsp warmed apricot jam,
100 gms icing sugar


Preheat the over to 170 C/325F/ Gas Mark 3.  Grease an 8-inch round tin and line the base with baking paper.

Using a hand mixer, beat together the caster sugar and butter, till it turn pale and fluffly. Add in the eggs and milk. Sift in the flour and baking powder, then gently fold in using a wooden spoon.

Add in half the mixture to the prepared cake tin, and add in a few drops of orange food coloring to the remaining cake mix, then add in the rest of the half colored cake mix, swirl it with the spoon to give it a marbled effect.  Bake in the preheated oven for 35-40 minutes, or until well-risen and firm to the touch. Leave to cool in the tin for `10 minutes, then turn out and finish cooling on a wire rack.

Take a small amount of the icing to make the spider, and color it with black food coloring. then add a few drops of orange food coloring  to the rest of the icing, and roll on a surface lighly dusted with icing sugar. Brush the cake with the apricot jam and cover with the icing, smoothing with your hands. Trim the edges at the base and keep the trimings for the spider.

Add few drops of black food coloring and water to the icing sugar to make a paste. Spoon in to a small piping bag fitted with a medium plain nozzle, then make a spider web over the cake.  Using the black colored icing, shape it into an oval for the spider's body, then shape eight legs from the remaning black icing and two eyes from the orange icing trimings.
HAPPY HALLOWEEN!!


  • Digg
  • Del.icio.us
  • StumbleUpon
  • Reddit
  • RSS

Sunshine with Sushi!

Individuals in different parts of the world eat Sushi in different ways, for me it is my much-loved breakfast. Nothing can be a better than starting my day with sunshine and sushi.  It was indeed an amazing experience when my friend Macau visited me and taught me how to make fresh sushis at home. It was like some Japanese expert guiding me how to make sushi !!, just the right way to roll it from both the ends, the perfect technique to slide your knife  through the sushi to get the bits even,  a few seaweed sheets,  some fresh and crispy cucumber and sushi rice all combined to give you an authentic sushi, the Japanese way!  This recipe is a must for all sushi connoisseurs!  Devour this Vegetable Sushi recipe.

Ingredients
2 cups of boiled sushi rice,
4 tables of white vinegar,
Salt as per taste,
4 Nori sheets,
1 cup of cucumber cut into strips,
1 cup of carrots cut into strips
You will also need
Sushi rolling mat,
Knife,
1 bowl of cold water
Moisten you hands in the bowl of cold water, to avoid the rice sticking to your fingers and also to the rolling mat. Then spread the Nori sheet on the rolling mat and layer of sushi rice in center of the Nori, making a rectangle. Make sure that the rice lies evenly over the Nori.
Lay two cucumber strips and one carrot strip, horizontally across the center. You can changed the combinations of vegetables.
Using the rolling mat, fold the Nori and apply pressure, make sure to give a round shape to the sushi, not rectangular. Apply pressure using your entire fingers on the top taking support from the thumbs placed below. Fold the mat forward once again and apply more pressure.
Dip the entire knife in cold water, trim off the uneven ends, then cut the sushi into six even pieces. Serve the making on a plate with each bit facing up with light soy sauce and wasabi as a dip.

  • Digg
  • Del.icio.us
  • StumbleUpon
  • Reddit
  • RSS

Living a Dream- Italian Sponge Cake- Pan di spagna- Recipe from Cake Boss

I have been living a dream for some time now, in my next life I want to be Buddy Valastro. I simply admire the way he bakes his cakes. Every time I observe him on TLC, I would wonder what must be the secret to his success, what must be the recipes he would be using to make his cakes, I am left in awe!
I could see so many of my queries being answered and conceivably some ingredients of my dreams coming true soon. And before you know it! I came across his book Cake Boss: stories and Recipes from Mia Famiglia. All I could have done was to wait for the book to arrive and start baking from it.
I contemplated on opening with the basic sponge cake and then rolling on. The deliberation of converting my British baking methods to American was overwhelming but I got on with it, and voila! When friends around lived through the cake, the instantaneous response was; hmmmm! The cake comes straight from the bakery!! What more can I express about the cake, yes it was the prevalent accomplishment for me indeed!  My contentment and delight knew no bounds! And yes this is just the commencement, so many more to come from Buddy’s book, Mama Mia!

1 ½ cups sugar, plus more for lining parchment paper,
5 extra large eggs at room temperature,
1 teaspoon pure vanilla extract,
Drop of lemon oil (Optional),
1 ½ cups cake flour, sifter, plus more for flouring the cake pan,
1/3 cup vegetable oil,
Unsalted butter; for greasing cake pan (about 1 tablespoon); non-stick cooking spray or vegetable may be substituted

Position the rack in the center of the oven, and preheat the oven to 350F
Put the sugar, eggs, vanilla, and lemon oil, if using, in the bowl of a standing mixer fitted with whist attachment. (if you don’t have a stand mixer, you can put the ingredients in a bowl, and use a hand mixer with the blending attachments). Beat starting on low and raise to medium and whip until the mixture is thick, shiny, and ivory in color, and has multiplied several times in volume, approximately 15 minutes. Remove the bowl from the mixer and use a rubber spatula to scrape as much mixture as possible off the whisk attachment and into the bowl.
Add the flour and patiently fold in it with a rubber spatula, then pour in the oil, and fold in until fully absorbed into the mixture.
Grease and flour a 9 inch cake pan. Pour the batter into the pan, scraping down the sides with a rubber spatula.
Bake until the cake begins to pull from the sides of the pan and is springy to the touch, 30 to 40 minutes.
Remove from the oven and let cool for at least 30 minutes, preferably an hour. The cake should be at room temperature before you remove it from the pan. Put a piece of parchment paper on a cookie sheet, top with sugar, turn the cake out onto the parchment, the sugar will keep it from sticking.


  • Digg
  • Del.icio.us
  • StumbleUpon
  • Reddit
  • RSS

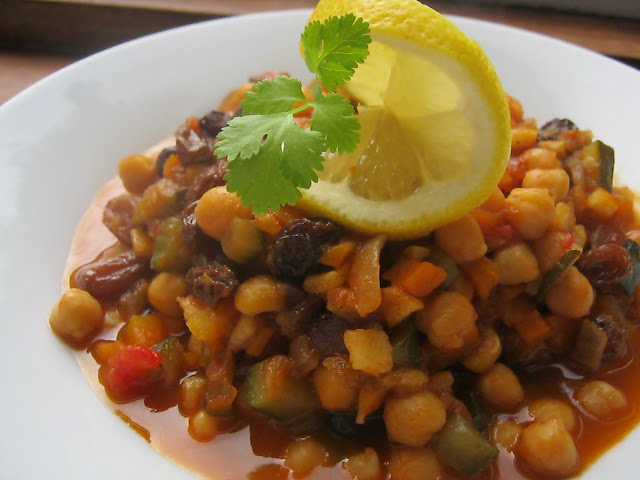
Enjoying the Indian Summers in British Autumn- Moroccan Chickpea Casserole

Living so many years in Britain, I discovered a new term ‘Indian Summers’, What?  But it was for real. I experienced the Indian summers in the midst of autumn here. Its only when I thought, it was changing from summers to autumn, and preparing for the wardrobes to change to winter wears, I realised it was time to dig out my summery clothes again, nonetheless it was absolutely welcome. I couldn’t have let gone the beautiful Indian Weather, and it took only a couple of minutes for me and my friend to decide to go to the waterfalls in Brecon.
 The amble through the caves and waterfalls was completely spectacular and captured our hearts. I arrived back home, feeling invigorated and rejuvenated.  What could my revitalized and revived mind cooked for dinner? The Moroccan chickpea casserole was a supreme delicacy to put in some supplementary relish to life with the sparkle of the sultanas and newness bursting from the lemon zest and the protein packet chickpeas with flavours of vegetables!

INGREDIENTS
1 tablespoon of butter,
1 large onion chopped,
1 carrot, chopped,
1 courgette, chopped,
2 cloves of garlic crushed,
½ teaspoon ground cinnamon,
½ teaspoon ground turmeric,
¼ teaspoon cayenne pepper,
1 can diced tomatoes,
2 cups vegetable stock,
1 tsp sea salt,
½ cup apricots,
¼ cup sultanas,
Zest of 1 lemon,
Fresh coriander to garnish

Freshly cooked rice to serve

Soak the apricots in hot water. Heat a large saucepan, over medium heat, melt the butter. Tip in the onion and carrot and cook covered for 5 minutes, or until softened. Tip in the chopped courgette, garlic, cinnamon, turmeric, salt, cayenne, tomatoes and the vegetable stock and salt. Bring down the heat and simmer it for 30 minutes covered stirring occasionally.
Chop the apricots and add the apricots, raisins, lemon zest, and chickpeas to the vegetable mixture and cook 5 minutes longer, or until hot and the flavours are assimilated.  Serve with hot rice, garnished with fresh coriander.


  • Digg
  • Del.icio.us
  • StumbleUpon
  • Reddit
  • RSS

Stepping Into a New World- Dotty Chocolate Chip Cake

My friend Esther’s daughter turns thirteen today, she is stepping into a whole new world! What significance could I have given to her on this unique day of her life, that her approaching days in her life will  only be multi-coloured, vivid and vibrant just like our dreams.  To celebrate and honour this occasion, I made this moist and rich dotty chocolate chip  cake for her, not to mention oh so delicious and oh so dream!!.
Ingredients,
175 gms soft margarine,
17gms caster sugar,
3 eggs beaten,
175 gms plain flour,
1 tsp baking powder,
2 tbsp cocoa powder,
55gms white chocolate chips,
40 gms small coloured sweets to decorate
For the icing
175 gms milk chocolate or plain chocolate,
100 gms unsalted butter,
1 tbsp golden syrup
Preheat the oven to 170C/325F/Gas Mark 3. Grease a 20 cm/ 8 inch round cake tin and line the base with baking paper.
Place the margarine, sugar, eggs, flour, baking powder and cocoa powder in the bowl and beat until just smooth. Stir in the chocolate chips, mix evenly.
Spoon the mixture into the prepared tin and spread the top level. Bake in the heated oven for 45 minutes, until risen and firm to the touch. Leave to cool in the tin for5 minutes, then turn out and finish cooling completely on a wire rack.
For the icing, place the chocolate, butter and golden syrup  in a saucepan over a low heat and stir until just melted and smooth.
Remove from the heat and leave to cool until it begins to thicken enough to leave a trail when the spoon is lifted. Pour the icing over the top of the cake, allowing it to drizzle down the sides. Arrange the sweets over the top of the cake!


  • Digg
  • Del.icio.us
  • StumbleUpon
  • Reddit
  • RSS

Indian Korma, the British Way

Life is full of suprises. Sometimes amusing ones. When I came to Britan years ago, it was shocking but at the same time so marvelous to see Indian restaruants more in number than Fish Chips.  I was enormously elated to see Britan’s affection for Indian curries. But life had a one more surprise to unfurl.  A couple of weeks ago, I came across a British Chef, who was just not passionate about eating Indian food, but totally zealous about cooking authentic Indian curries. This was my opportunity of learning the much loved victuals of natives around, the Root Vegetable Korma being one of them. This mild and creamy curry is a vegetairan’s delight, the freshness bursting from the fresh herbs  and sweetness from the nuts makes this dish so splendid.

Ingredients
1 large or 2 small parnship, peeled rough , 1 inch cubed,
1 medium swede, peeled and rough, 1 inch cubed.
4 medium carrot, peeled rough 1 inch cubed,
1 tin cocunut milk,
6 cardomon pods, dehusked and ground,
2 inch cinnamon bark or stick,
2 tsp minced chilli,
2 tbsp vegetable oil,
2 onions, roughly chopped,
3 cloves garlic, crushed and chopped,
1 inch piece of ginger, grated,
2 tsp ground cumin,
2 tsp ground coriander,
2 tsp tumeric,
Season to taste salt; 2 pinches sugar, black pepper,
50 ml single or double cream,
100 cashew nuts, roughly chopped,
2 tbsp Fresh coriander, chopped

Place vegetables in pan, add cocunut milk, cardomon, cinnamon and chill and bring to the boil and simmer for 10 minutes. Cover and allow to stand. Heat oil in a heavy bottomed pan, add onions and allow to soften but not to color. Add garlic and ginger and cook gently for 2 minutes.
Add cumin, coriander and turmeric, toast the spices for a couple of minutes. Add the spice mix to vegetables along with half the cashews, salt, pepper and sugar. Cook for further 10 minutes, until the vegetables are tender. Allow to cool for  2 minutes then stir in the cream. Toast the remaining cashews and sprinkle these and chopped coriander over the dish, serve immediately.

  • Digg
  • Del.icio.us
  • StumbleUpon
  • Reddit
  • RSS

White Chocolate Coffee Gateau


It’s my very dear friend Jane’s birthday today and yes ofcourse I am the girl who bakes cakes for all the birthdays in my family and for my friends around, and as much as I thought I am cheeky enough to unearth what would be the best flavour the birthday girl’s favourite cake, today I was left surprised to see my friend waiting for her favourite cake because she was smart enough to understand what was the process of me discovering out her favourite flavour. Well, surprises for a surprise coffee gateau birthday cake!!!
 Ingredients
40 gms unsalted butter, plus extra for greasing,
85 gms white chocolate,
125 gms caster sugar,
4 large eggs, beaten,
2 tbsp very strong black coffee,
1 tsp vanilla extract,
125 gms plain flour,
Chocolate curls, to decorate
For the Frosting
175 gms white chocolate,
85 gms unsalted butter,
125 gms crème fraiche,
125 gm icing sugar, sifted
1 tbsp coffee liquer or very strong black coffee

Preheat the oven to 180C/350F/Gas Mark 4. Grease two 20-cm/ 8-inch sandwich cake tins and line the bases with baking paper.
Place the butter and chocolate in a bowl set over a saucepan of hot, but not simmering water and leave on a very low heat until just melted. Stir to mix lightly, then remove from the heat.
Place the caster sugar, eggs, coffee and vanilla extract in a large bowl set over a saucepan of hot water and whisk hard and with an electric whisk until the mixture is pale and thick enough to leave a trail when the whisk is lifted.
Remove from the heat, sift in the flour and fold in lightly and evenly. Quickly fold in the butter and chocolate mixture, then divide the mixture between the prepared tins.
Bake in the preheated over for 25-30 minutes, until  risen, golden brown and spring to the touch. Leave to cool in the tins for 2 minutes, then run a knife around the edges to loosen and turn out onto a wire rack to cool.
For the frosting, place the chocolate and butter in a bowl set over a saucepan of hot water and heat gently until melted. Remove from the heat, stir  in the crème fraiche, then add the icing sugar and coffee liquer and mix until smooth. Chill the frosting  for atleast an hour, stirring occassionaly, until it becomes thick and glossy.
Use about one third of the frosting to sandwich the cakes together. Spead the remainder over the top and sides,  arrange the chocolate curls over the top of the cake and leave it to set in the refrigerator for another hour.

  • Digg
  • Del.icio.us
  • StumbleUpon
  • Reddit
  • RSS

Corriander Garlic Naan

This soft and chewy naan bread is a just right accompaniment to any Indian curry, my much-loved being the Korma, i totally love how the bread puffs up and bubbles at certain spots. It looks delicate but copes to be soft, chewy and fluffy even when dished in the most creamiest of curries.
This naan is so scrumptious, the contemplation of baking it always cowed me, but yummy things are not always intricate. The bread is in the oven just for 5 minutes and for less than 3 minutes in the grill. When the bread comes out fresh and warm there is something so satisfying about baking these naan breads!

Ingredients,
280 gms strong white flour, plus extra for dusting,
1 tsp salt,
1 tbsp ground coriander,
1 garlic clove, very finely chopped,
1 tsp easy-blend dried yeast,
2 tsp clear honey,
50 ml lukewarm water,
4 tbsp natural yogurt,
1 tbsp vegetable oil, plus extra for brushing,
1 tsp black onion seeds,
1 tbsp chopped fresh coriander

Sift the flour, salt and ground coriander together into a bowl and stir in the garlic and yeast. Make a well in the centre and pour in the honey, water, yogurt and oil.  Stir well with a wooden spoon until the dough begins to come together, then knew with your hands until it leaves the side of the bowl. Turn out onto a lightly floured surface and knead well for about 10 minutes, until smooth and elastic.
Brush a bowl with oil. Shape the dough into a ball, put in the bowl, and cover it with a damp tea towel. Leave it to rise in a warm place for 2 hours, until the dough has doubled in volume.
Put the baking tray in the oven and preheat to 240C/475F/Gas Mark 9. Preheat the grill, turn out the dough onto a lightly floured surface and knock back with your fist to get rid of the air bubbles during the rising process. Divide the dough into three pieces, shape each piece into a ball and cover two of them with oiled Clingfilm.
Roll out the uncovered piece of dough into a teardrop shape about 3/8 inch think. If the dough has become too soft use a little bit of flour to roll it out. Place the rolled out naan on the preheated baking tray and sprinkle with the onion seeds and chopped coriander. Bake in the preheated oven for 5 minutes, until puffed up. Transfer the naan bread to the grill pan, brush with oil and grill for 2-3 minutes. Repeat the same process for the other two naans.

  • Digg
  • Del.icio.us
  • StumbleUpon
  • Reddit
  • RSS

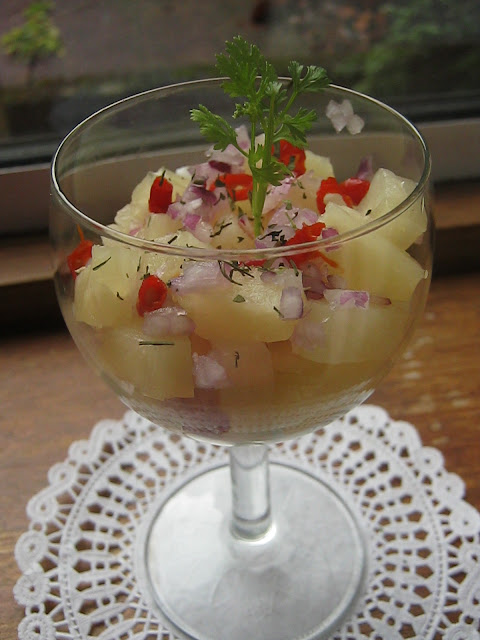
Lets do the Salsa!


There you are in the produce walkway. And you find a huge, vibrant, evidently ripened and succulent pineapple.  You try to walk past, but it buzzes ‘buy me’, who could resist?
But now that I have gorgeous fruit in my refrigerator, what do I do with it swiftly?
This pineapple, salsa is one of my much-loved recipe. I totally adore the balance of the heat and sweetness in this dish. And it hardly takes any time to get it ready.
Why the sugar? It helps to pull out from juices from the fruit, as well as to balance the power of Serrano and jalapeno. Feel free to mishmash any other peppers.
This salsa is a grand equal for any meal. With its hearty, fruity, tang, this gorgeous salsa will power your meal from the start to finish.
1 cup diced fresh pineapple,
2 tablespoons finely chopped red onion,
1 tablespoon finely chopped cilantro,
1 tablespoon sugar,
2 tablespoon finely minced Serrano chillies,
2 tablespoons finely minced jalapeño peppers,
2 tablespoon juice of fresh lemon,
Pinch of salt
Mix together all the ingredients and refrigerate for over an hour for the flavours to mature.

  • Digg
  • Del.icio.us
  • StumbleUpon
  • Reddit
  • RSS

Devil Visits the Church!

Sometime some things in existence cannot be articulated with terms like thank you or welcome. Some events are purely so out of the ordinary, there has to be a unique approach of conveying it. It was time for such a juncture in my life.  After a extended wait of months, we were geared up to hail a new pastor to our Church.  What could it have been other than this wonderfully moist and beautifully flavored of fluffy layers stacked with the velvety ganache in middle? Pure comfort food!
Yes the devil’s trip to our Church made the reception of the Pastor yum yum!!!
Ingredients
140gms plain chocolate,
100 ml milk
2 tbsp cocoa powder,
140g unsalted butter, plus extra for greasing,
140 gms muscavado sugar,
3 eggs, separated,
4 tbsp source cream or crème fraiche,
200 gms plain flour,
1 tsp bicarbonate of soda
For the Frosting,
140gms plain chocolate,
40 gms cocoa powder,
4 tbsp sourced cream or crème fraiche,
1 tbsp golden syrup,
40 gms unsalted butter,
4 tbsp water,
200 g icing sugar

Preheat the oven to 160C/325F/Gas Mark 3. Grease two 20-cm/ 8-inch sandwich tins and line the bases with non-stick baking paper.
Break up the chocolate and place with the milk and cocoa powder in a heatproof bowl over a saucepan of hot water, then heat gently, stirring, until melted and smooth. Remove from the heat.
In a large bowl beat together the butter and muscovado sugar until pale and fluffy. Beat in the egg yolks, then the soured cream and the melted chocolate mixture. Sift in the flour and bicarbonate of soda, then fold in evenly. In a separate bowl, whisk the egg whites still enough to hold firm peaks. Fold into the mixture lightly and evenly.
Divide the mixture between the prepared tins, smooth level and bake in the preheated oven for 35-40 minutes or until risen and firm to the touch. Cool in the tins for ten minutes, and then turn out onto a wire rack.
For the frosting, place the chocolate. Cocoa powder, sourced cream, golden syrup, butter and water in a saucepan and heat gently, until melted. Remove from the heat and sift in the icing sugar, stirring until smooth. Cool, stirring occasionally, until the mixture begins to thicken and hold its shape.
Spilt the cakes in half horizontally with a sharp knife, to make four layers. Sandwich the cakes together with about a third of the frosting. Spread the remainder over the top and sides of the cakes.

  • Digg
  • Del.icio.us
  • StumbleUpon
  • Reddit
  • RSS

The Slice of Joy- Pizza Margherita

i

Sometime long back in history, I had known that the Queen Margherita of Italy was served a pizza which signified the flag of Italy, consisting of tomato suggesting of the color red, the mozzarella representing the color white and basil representing the color green.. To me every slice of this  pizza implies the diverse colors of life. The green in this pizza represents energy to me, the red passion for life and white a way to brilliantly start my week, I couldn’t have found of an enhanced way to kick start my week with this slice of joy!

Ingredients
175gms of plain flour,
1 tsp salt,
1 tsp easy-blend yeast,
1 tbsp olive oil, plus more for brushing and drizzling
6 tbsp luke warm water
Topping,
350gms of tomatoes, peeled and chopped,
1 garlic clove, thinly slice,
55 g mozzarella cheese,
1 tsp dried oregano,                                                                                    
Salt and pepper,
Fresh basil sprigs to garnish

Sift the flour and salt together into a bowl and stir in the yeast, give it a mix. Make a well in between and add in the oil and lukewarm water. Stir well with a wooden spoon, till the time the dough begins to come together, and then knead the dough on a lightly floured surface with you hands for ten minutes.
Brush the bowl with oil, shape the dough into a bowl, roll the ball in the bowl to ensure that its coated with oil, to prevent of forming of the skin.. Put the ball in the bowl and cover it with a damp tea-towel. Leave it in a warm place to rise for hour, until the dough has doubled in volume.
Brush a baking tray with oil. Turn out the dough into a lightly floured surface, knock back the dough with you fist and knead for another one minute. Roll out the dough to a circle of 25 cms/ 10 inches with a rolling pin. Place on the prepared baking tray and push the edges of the circle slightly all round. Cover the baking tray with a damp tea towel and leave to rise in a warm place for 10 minutes.
Preheat the oven to 200C/400F/Gas Mark 6. Squeeze some juice out of the fresh tomatoes and roughly chop the flesh, spread them evenly over the pizza base and drizzle with oil. Sprinkle the garlic over the tomato, add the cheese, and sprinkle with the oregano and season with salt and black pepper. Bake in the pre-heated oven for 15-20 minutes, until the crust is golden brown and crisp.  Brush the crust with oil, garnish with basil sprigs and serve immediately.  

  • Digg
  • Del.icio.us
  • StumbleUpon
  • Reddit
  • RSS